1 hr. - Flipped the VS over and inserted all of the rivets, and began finishing up the skin.
And it's done!
Installed both antenna rods to see how it looks:
Scott Meyer - TAF Sling 4 Build Log
Labels
- Elevator (6)
- Empennage (21)
- Flying (3)
- Horz. Stabilizer (3)
- Links (1)
- Misc (2)
- Rudder (3)
- Vert. Stabilizer (5)
Wednesday, April 12, 2017
Monday, April 10, 2017
Vertical Stabilizer Skin
3 hrs. - It's been almost a month since my last post. Life's kept us busy! Had some down time with the Sonex engine I wanted to solve, and working away on my wife's office. Good news is the Sonex is airworthy again and back in the sky. I'll post about that soon.
Had to complete the VOR/GS/LOC antenna cable end before closing up the Skin. When I ordered the antenna and cable, I also purchased the wrong fitting. I needed Male ends but got female. Thought I had an extra one at my hangar...and I did...an extra Female end. Another order from Aircraft Spruce, and now the cable is terminated and connected to the antenna puck.
Skin is fitted and then I could enlarge the openings for the antenna rod exit holes.
If you look closely at the top, you can see the VOR/GS/LOC antenna rod sticking out. These thread into the puck thru the Skin, and have a Allen set screw that locks it in place.
I reamed out all of the rivet holes, deburred the skin and structure and primed the inside Skin. It's not pretty but also not meant to be visible, just cut down on corrosion.
Sunday, March 12, 2017
Rudder Fiberglass Tip
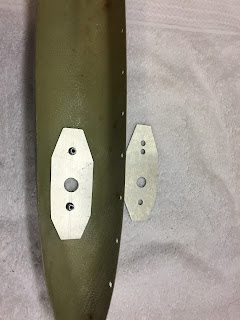
1.5 hrs - After consulting with Craig M on the type of strobe he's using, I went ahead and made a new backing plate. This gets connected to the fiberglass tip with two rivnuts. The plate that TAF sends has multiple holes punched, none of which align with the 1.75" distance for the mounting holes on the AveoFlash posistrobe XP unit.
Next was to rivet the tip on with the filler panel (aluminum). Don't forget to run the pull wire!
Next was to rivet the tip on with the filler panel (aluminum). Don't forget to run the pull wire!
Rudder Skin (from Feb. 16, 2017)
2 hrs. - Forgot to post this last month...completed rivetinfmthe son of the rudder to the structure. Began fitting the fiberglass tip, but quit when I looked at the strobe backer plate...need to research the make of strobe I plane to use.
Sunday, February 12, 2017
Flying my Sonex N629SX
While there hasn't been much time for building on the Sling, I have been keeping up my currency in the Sonex. Gone flying twice in the last week...yesterday Liam went up with me again and we buzzed around the Honda R&D campus where I work. The picture shows the layout of R&D and in the background is the Marysville Auto Plant (MAP) where's the Honda Accord and Acura TLX are manufactured. To the right of the R&D campus is Transportation Research Center (TRC) of Ohio. It's a jointly owned facility between Honda, and Ohio State University - that is used for product durability testing before cars go to mass production.
Vertical Stabilizer Structure Complete
2 hrs. - It's been over a month since any work was done on the Sling 4. We've had a major diversion with the remodeling and tenant finish of my wife's new office fo her medical practice. That project has made some great progress...so this afternoon while "relaxing" I decided to step out to the garage and complete the vertical stabilizer structure. I had previously finished the rivnuts and the forward spar and ribs. Completed reaming out the hole s in the multiple parts of the rear spar. Made sure I noted the holes not to rivet, and finished riveting the rear spar structure to the ribs. Also reviewing the plans I noticed missing a doubler plate for the top rib, for the Glide Slope / Localizer / VOR antenna puck. This is now complete.
Tuesday, January 3, 2017
Rudder structure begins
2.5 hours - While I wait for the new / replacement Rivnut tools...I started on the rudder assembly. Began by preparing the spar and ribs, spraying with primer, and then bringing the parts home to complete in my garage workshop (where I built the Sonex).
This is what the structure looks like riveted together. The tip rib is offset with the counterweight at the end.
This is what the structure looks like riveted together. The tip rib is offset with the counterweight at the end.
Subscribe to:
Comments (Atom)


